Wednesday, March 2, 2011

New stuff, and the same old thing

Sometimes when I sit down to write a blog post I think, "this is going to be stupid. The progress I've made is too incremental for anyone else to care about. Does this little bit of work really warrant a whole blog update?" But then I hear Travis' voice saying, "Blog posts should just be like your own journal, don't worry about an 'audience'. It's not for them." Wise words indeed.

So I got the hobbit or "Fright Night" as I like to call it, running with the tillotson carburetor. I had got everything buttoned up earlier this week, but a series of dumb mishaps foiled my plans. First I drilled and tapped the pulse plate and threaded in the pulse fitting. When I attempted to torque down the fitting my man hands, (ok, AND a wrench) sheared it right off in the plate. Wow, what an annoying feeling.
IMG_5879
IMG_5880

After a long drive to the nearest hobby store, I managed to get another pulse fitting and I put everything together on the subframe. It was at this point that I realized I hadn't put a gasket under the pulse spacer, and then when I fixed that and dropped the frame down on to the subframe I pinched the fuel line between the intake and the frame causing a major gash in my fuel line. After fixing the fuel line in a janky manner, I pushed the hobbit all around my neighborhood attempting to bump start it and actually got it to fire up and putt a little bit but ultimately decided that I needed to put some more time into the installation before pronouncing it a success.
Well, this weekend I took some time and decided to do it right. I procured some actual motion pro fuel line, which I have to say works a lot better than the vinyl crap I usually have laying around. The motion pro stuff has a lot thicker sidewalls so I feel like it is much less prone to kinking. Here is the pulse line all hooked up to the carb.
IMG_5901
IMG_5902

I also decided that my beer-box gasket left a little to be desired so I re-cut another one out of some thick gasket material. Here is the whole carb-intake sandwich right before going into the bike.
IMG_5899

I shot video documenting the whole process but when I sat down to edit it I thought, "wow, replacing a carb on a moped, quite possibly the most boring subject possible." So rather than a riveting narrative, I just put it to music and called it good.

18 with a bullet from Joel Kvernmo on Vimeo.


And what do you know, it runs! It started right up and goes like a banshee. Well, it goes like a slow banshee with a stock cylinder, stock pipe, and overly large carb. It's a bit gluggy. So now begins Fright Night Stage 2: The Search for a Malossi Ring and Pipe. I can get a ring for the malossi kit very easily but before I put that kit on I should probably have a pipe.

It's a very satisfying feeling to spend months on a project and finally be able to ride it around, but it's an even better feeling when that project can carry your butt up hills and to and from locations dependably for the same length of time it took you to build it. So what I'm saying is, it's all well and good to get this thing running, but the real success will be when I've ridden it for a while and can confidently say that I built it right.

Wednesday, February 16, 2011

I'm coming out of the lizard closet. I love geckos.

Back in the 90's, Gecko clothing reigned. Everyone (in my very limited circle at 9 years old) had Gecko Hawaii tshirts, they were usually neon of some sort, and had a gecko wearing sunglasses. I'm having difficulty finding a good photo of the old Gecko Hawaii tshirts, but here is a pair of underwear that someone made from the kind of tshirt I'm describing:
(sidenote: this pair of undies comes from a girl that rosanna had a booth next to at a craft fair last year... wierd.)

The awesomeness of the shirts is probably what convinced me that I needed to get a pet gecko. I even hatched a plan to catch a gecko while on a family vacation but it turns out that it is illegal to kidnap and transport a gecko back to Washington. At least that's what my mom told me. Eventually, I forgot about my gecko lust and life went on.

Well, Rosanna and I just returned from a family trip to Hawaii and I'm happy to report that though Gecko Hawaii Apparel is difficult to find, the actual lizards are alive and thriving in Hawaii. Here I am hunting outside our rental house:
photo (1)
photo (2)
And here are some lizard shots that I snapped:
IMG_5603
IMG_5586


Upon our return I was overcome by an insatiable desire to work on mopeds. Last week, I picked up a 8/32" pneumatic fitting at a hobby store and set to working on my hobbit intake spacer plate (see my previous blog post).
IMG_5697
Typically the smallest fitting that can be had at an auto parts stroe is closer to 1/2" threading which is much too big.
I picked up some 1/2" aluminum from online metals, who, by the way, are really nice guys, most of the time I dig through their scrap and they just give me the materials for free.
The downside to full time employment is that it makes it difficult for me to go visit Michael Mike at the Wizard Lair. Doing a project like this on his mill would take virtually no time at all, but as I can't get down there, I am forced to use a jigsaw, drill and dremel.
IMG_5687
IMG_5690
IMG_5691
It's not beautiful, but it will certainly give me a clue whether I'm going the right direction.
IMG_5693
IMG_5694
Matt Smith has a plate of 3/8" that I may remake this plate out of, I think that 3/8" would be just the limit of how thin I can go and still have threading for the pulse fitting, If I do remake this one more time I should probably use a mill for a proper finish. In the meantime however, I now have a usable prototype. I just need to pull the hobbit apart and decide which side of the plate I want to tap in the pulse fitting.

UPDATE 3/4/2011:
A guy I know was recently spotted wearing this shirt. It's not Gecko, Hawaii, but the spirit is there.
Gecko shirt

Wednesday, February 9, 2011

Kinda cheesy, kinda cute


I have some big stuff in the works and some moped videos to share but for now I'm going to Hawaii!!!

Sunday, January 23, 2011

It's not ALWAYS the destination...

...but sometimes the destination is pretty sweet too.
1295822967094
Thanks to Arianna for the picture.
Mopeds are fun. Fun to build, fun to ride, and fun to push beyond their intended limits. But sometimes in our quest to build the fastest, prettiest, and blastiest we lose sight of the fact that without friends to ride with, riding mopeds would just be another kooky hobby like pogo sticks or unicycles.

Saturday, January 15, 2011

Homebrew Hobbit Monster post

It's been a crazy, busy couple of weeks here at Kastle Kvernmo; weddings, Rosannas sisters in town, snow, I started work at Microsoft... somehow we managed to survive it all.

A while back I posted here about my tillotson carburetor experiments. Well, I'm gearing up for another bike project and I think I may have found the perfect tilly carb candidate.
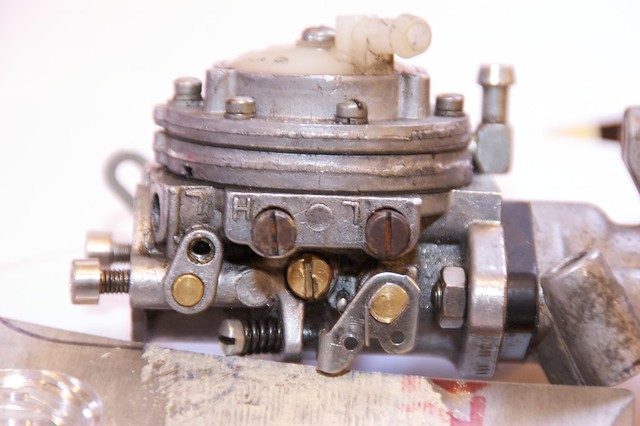
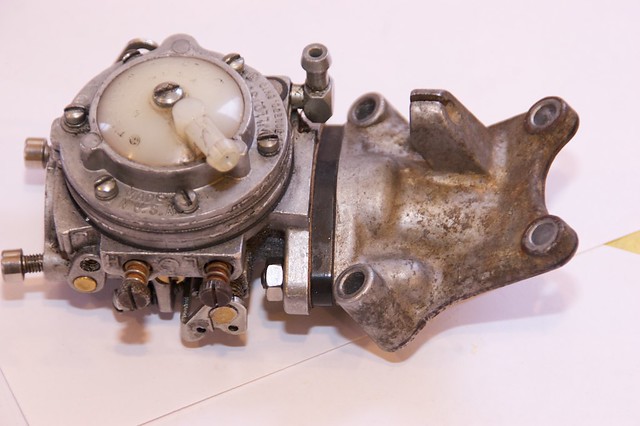
Just for review sake, Tillotson carburetors are whats called a pumper carb. You would typically find pumper carbs on chainsaws, weedwackers, blowers, and recently competition go Karts. While conventional moped carbs such as the (bing, dellorto, mikuni, etc.) use a float bowl and gravity to draw fuel into the carb, a pumper carb uses a diaphragm and a pulse line to pull the fuel into the carb. A pulse line is tapped into the case either right at the crank, or between the reeds and the crankcase near the intake. The diaphragm is sort of like the head of a drum and when the motor is running it creates a pulse which "pumps" the diaphragm, drawing fuel through the carb, and then into the intake. Why would anyone want to go this route rather than the tried and true conventional carbs? Well, first off, it isn't dependent on gravity for its fuel feed, the carb can be mounted in any position. I think that one reason kart racers have adopted the pumper carbs is due to the high speed cornering they do which could cause some issues gravity fed carbs. Another reason is that instead of having to replace jets for fuel mixture adjustment, the carb has mixture screws that jet the carb with requiring any disassembly. This easy jetting feature is what initially drew me to tillotson carbs.
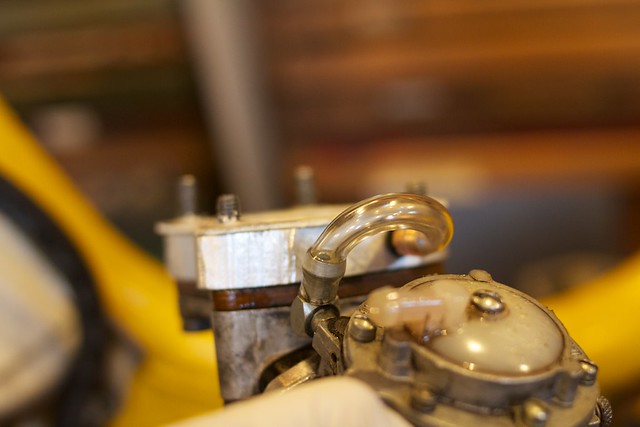
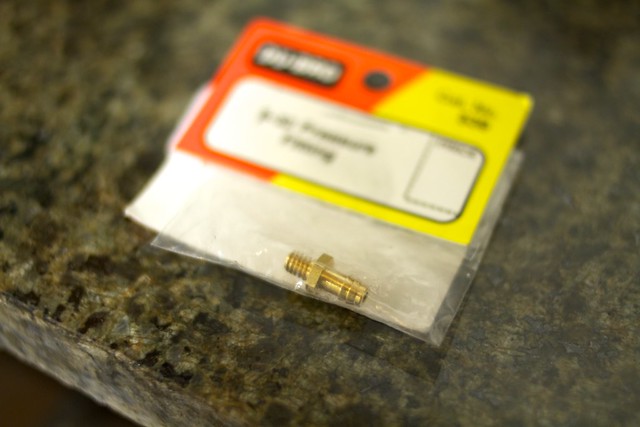
Here is what the high and low circuit jetting adjustments look like:
DSC_8951
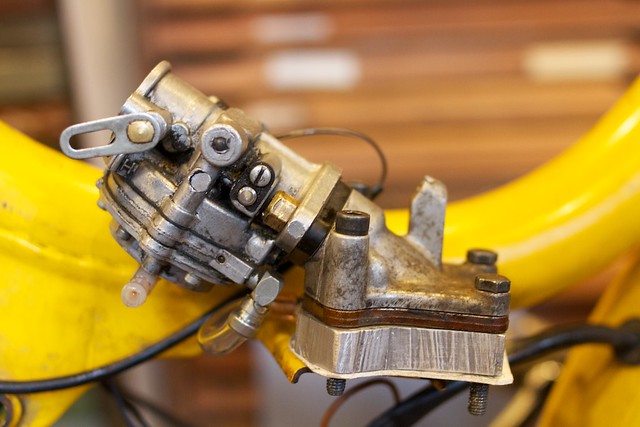
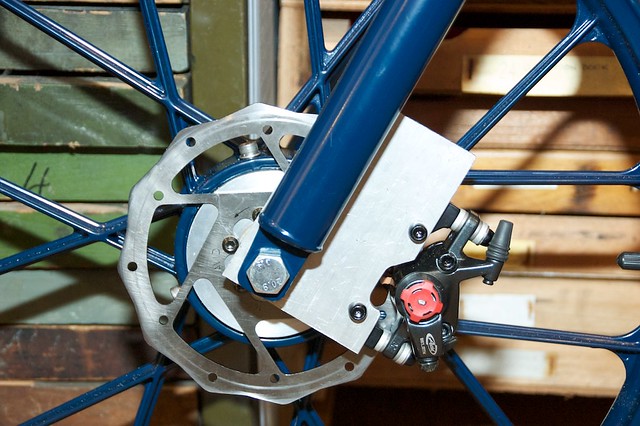
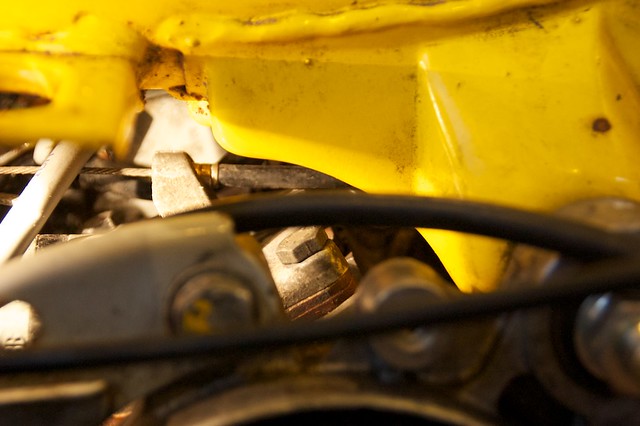
A little while back I acquired a Honda Hobbit from Phil aka Responsible Jon. Hobbits are great mopeds for a few reasons, pretty stiff tube frame, case inducted, dual variated, and they are relatively easy to find parts for. They do have one obvious downside though, and that is in order to access the carb the whole subframe must be dropped.
See the carb deep inside there? No? Well that's my point.
DSC_8961
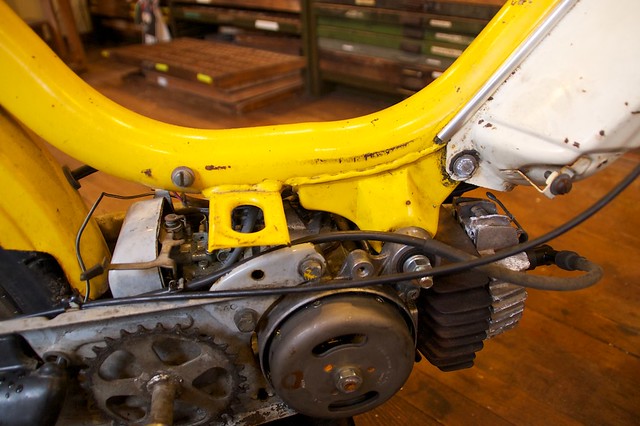
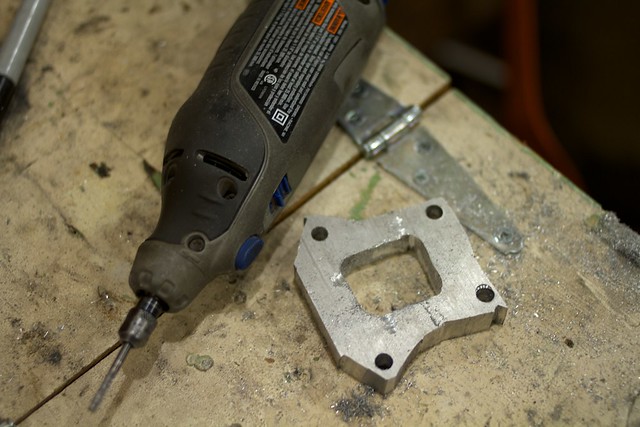
Granted, dropping the subframe is only a matter of one bolt, loosening the throttle cable, and watch out for the electrical wires and rear brake line, but dang, that's a lot more work than your typical carb access on a moped. My solution therefore, is to install a tillotson carb on my hobbit. Rather than tap into the crankcase I am going to make a spacer plate to slip under the reeds and intake. I'll tap and thread in a pneumatic nipple, and bolt it all up. Once I've done this jetting will be easy to adjust and when I decide to swap the stock cylinder for an aftermarket kit or change pipes I'll simply twist the circuit screws to jet accordingly.
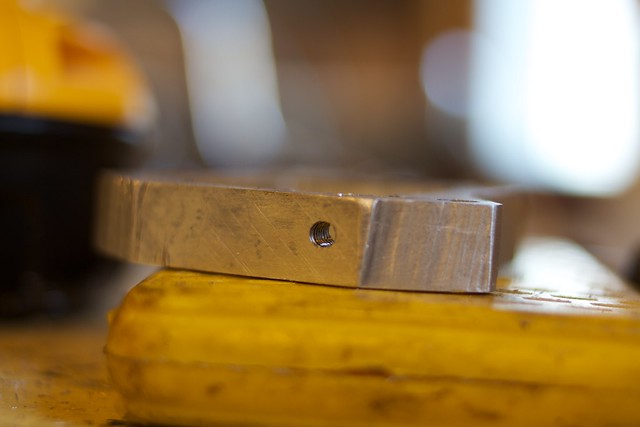
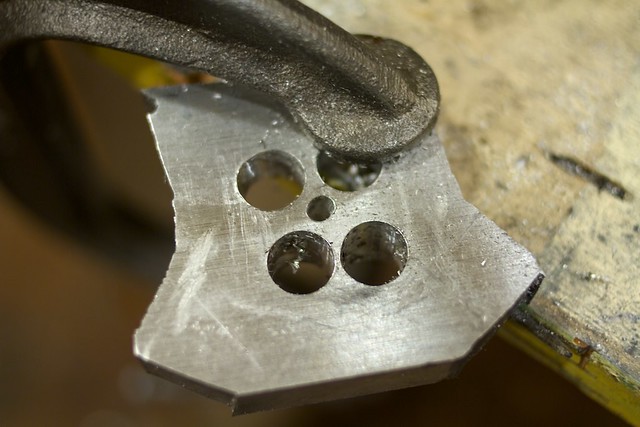
The pulse plate:
As you can see I have traced the outline of the intake onto the block and I have begun removing material from the inside of the plate.
DSC_8947
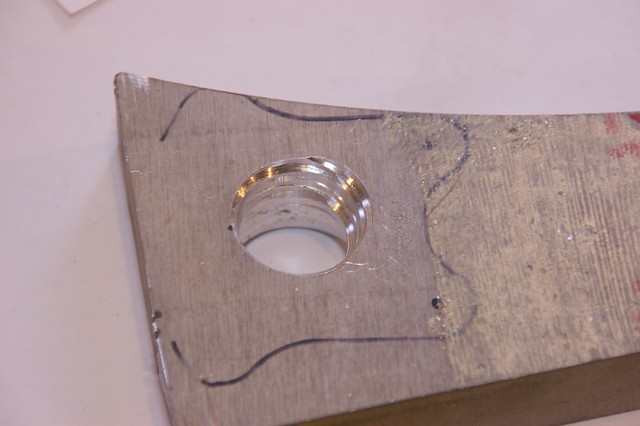
I'm not sure how much vertical clearance I have for my plate inside of the frame. Just eyeballing it, I would guess that the carb could be raised somewhere around a half inch.
DSC_8964
I'm starting with a big chunk of 1" aluminum plate simply because it was laying around. If it turns out to be way too much I can use this as a template for another more modest plate or simply cut and mill it down.
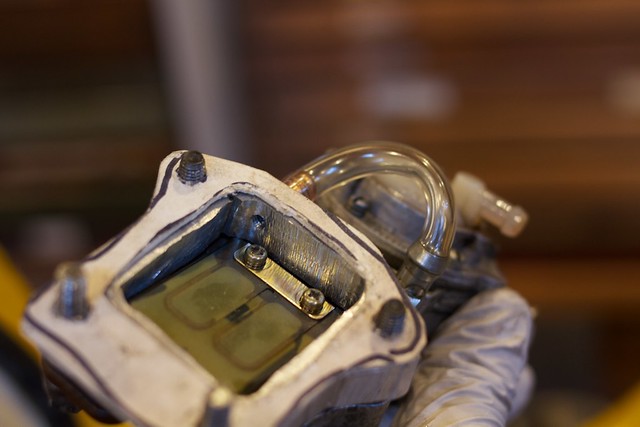
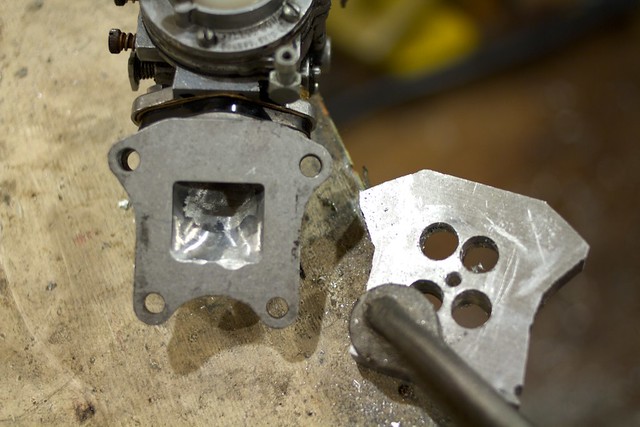
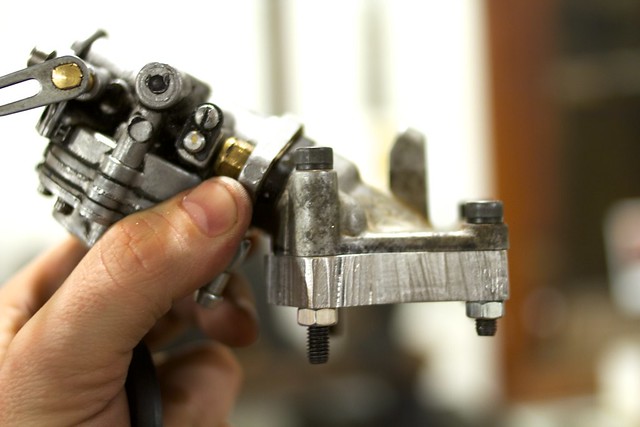
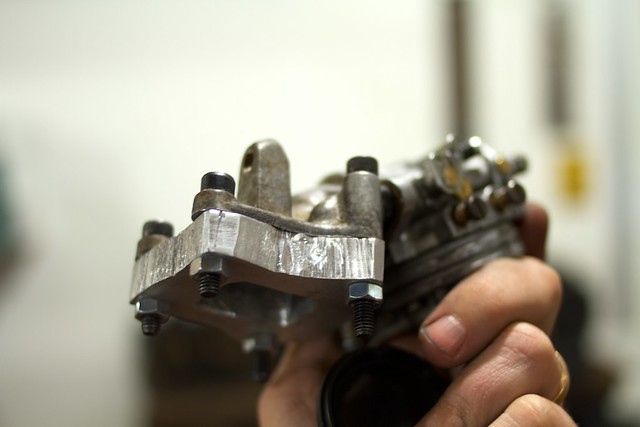
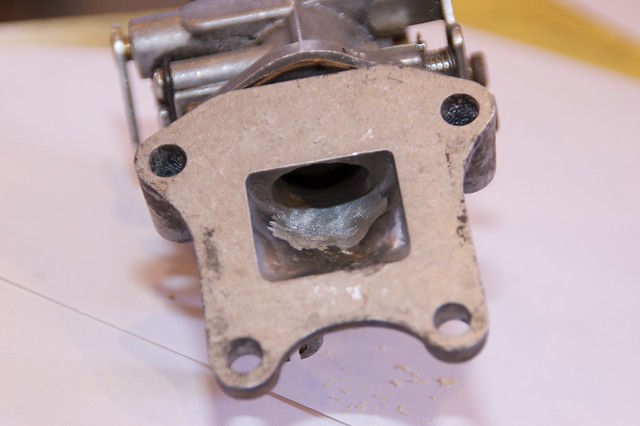
Intake:
Amazingly, the stock hobbit intake mounts almost perfectly to the tillotson flange. I had to ream out the bolts holes a couple millimeters on the carb but otherwise it fits very nicely.
DSC_8948
The tilly I'm using has about a 20mm bore but with the butterfly in there we'll call it 18mm.
DSC_8950
So I put my dremel skills to the test and opened up the intake to around 19mm.
DSC_8949
So that's in the works.

In other news, I've been making alcohol. Around Halloween Rosanna and I decided that we wanted to make some homemade Christmas gifts. I've always been intrigued by home brewing and cider seemed like a fairly simple project to get involved in.
So, I bought some cider in gallon glass jugs, got some yeast and airlocks, and started brewing away. I racked the cider at about 1 month and then on Christmas eve I bottled the product. Now, when we gave out the cider as gifts, I told everyone that received one that they should just keep it in their pantry until valentines day. Hopefully by that time the carbonation in the bottle will have built up nicely and the taste will have mellowed. However, based on my observations of my second batch I fear my first batch may not be very good. This second batch is performing SO AWESOME! The yeast started bubbling right away, a foamy ring has formed around the top of the cider, and I can see a lot of CO2 activity going on. With the last batch the fermentation wasn't nearly so obvious which leads me to believe it may not be so great. Here is my batch #2 method/recipe:
1 five gallon carboy
1 airlock
5 gallons of apple juice
3.75 pounds sugar
1 packet of champagne yeast
DSC_8969
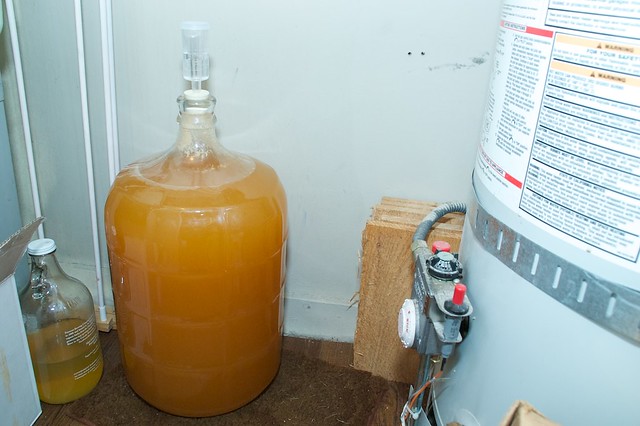
I sterilized everything, poured a couple of gallons of apple juice and all of the sugar into the carboy, and swished it all around for as long as I could in order to dissolve the sugar. I soaked the yeast in a little bowl of water to wake it up, added the yeast and most of the apple juice and sealed up everything with a little bit of vodka in the airlock. My dad got me a hydrometer (and the carboy, thanks dad!) for christmas so I was able to figure that by adding about 3.75lbs of sugar to the 5 gals of juice the potential alcohol content of the final product will be just about 11%. I hate super sweet cider so my goal is to have something akin to a dry apple champagne.
Here is a long video detailing my process:

Here is a short video of the carboy burping CO2. How exciting!


Speaking of "homebrew", last night I was searching for some information about homebrew and I came upon this magical remnant of internet days gone by; Ladies and gentlemen, I present the greatest website ever made..

Wednesday, December 29, 2010

Meat and Metal.

I've been doing a lot of grilling lately and I've tackled some new meats. For example, earlier this month I've cooked a brisket, two pork shoulders, baby back ribs, and made a really awesome stew.
Here are some pictures of the ribs:
DSC_8511
DSC_8514
I feel like I've learned a lot about how meat cooks from a chemical standpoint so it's been pretty fun. Also, for christmas Rosanna got this cookbook for me.

It's a really great book, it is a series of interviews with butchers and a couple of their favorite recipes. I think I'm going to make a tenderloin this week.


A couple of days before Christmas I went with Matt Smith down to the hinterlands of washington, I'm not sure where we were but I do know that we crossed the tacoma narrows bridge. We were on a rescue mission to pull an old dock out of the lake at his family's cabin. Here is "Man" Smith pulling the dock using only his pinkies.
DSC_8852

The mopeds are still coming along nicely. I went to the wizard lair to do some serious damage on the mermaid bike.
I cut the forks down 2.5". Naz welded them and I think that it improved the stance a lot. At least now it doesn't look quite so American Choppers.
Before:
DSC_8747
After:
DSC_8892

I got the disc brake properly spaced and I cut a bunch of material out of the caliper bracket, it's looking pretty sexy now.
DSC_8894

DEATHped still needs forks, I've put so much time and care into getting this bike just perfect, it would be a shame to put some plain EBR's on it. So I'm saving for hydros. The rear end is pretty much done, I just need to put on the rear gear and then the chain and a taillight. I'm not sure how I feel about the red and black pedal chain. Too much red? Nah, it's appropriately obnoxious.
DSC_8895

As these bikes come close to completion my mind starts drifting towards the other projects. Do I immediately start souping up the hobbit? I have two puch frames now (a chopped maxi and a wierdo colorshift pinto), should I build another puch? Should I slap a polini on the derbi? Rebuild the Hercules so Phil has a running bike to ride in Seattle? Only time and monetary concerns will tell.

Friday, December 10, 2010

SO MUCH GOING ON!

Wow, it has been a busy and productive week in Kastle Kvernmo.
On Saturday we had a crowd of Mosquito Fleeters over for a holiday dinner. Eighteen people all stuffed into our tiny home around one long table. It was great. My contribution for the dinner was one 9 lb pork shoulder. I put the rub on the meat a couple of days ahead of time and let it sit in the fridge. The morning of the dinner I got up to start the grill at 3:30 am. I tended the meat all day and by 5:00 pm it was deeeeelicious. Sadly though, I have no photo evidence of the magnificent feast.
UPDATE: one out of focus polaroid was found as evidence of the debauchery:
MF holiday dinner 2010
DEATHped finally has some appropriate shocks, I ordered some 320mm adjustables. I really think that the black fits nicely. The wheels are currently being trued by none other than Haulin' Colin.
DSC_8738
The Mermaid bike is really taking shape. Rosanna and I started assembling the parts and it is really coming together nicely. The disc brake assembly is fitting well and once I have everything perfectly fitted I will start hacking the caliper bracket down to a more aesthetically pleasing shape.
DSC_8749
The bike as a whole is finally rolling. Some things remain; chains, a pipe, a seat, handlebars, and cables, but really this is a far sight further along than ever.
DSC_8747
This tank is of course not THE mermaid tank but merely a placeholder. The forks need to be shortened by about two and a half inches which I hear is a relatively simple process.
I'll tease you with a glimpse of a project Rosanna and I have been working on. Can you spy what this is?
DSC_8746
And finally, in sad news, Phil (Responsible Jon) and his wife have moved to Indiana. It's too bad they had to go but they have an opportunity too good to pass up. I helped them pack up the truck and they stayed one night with Rosanna and I before they hit the ol' dusty trail. Here, in video form, is their last rainy moments in Seattle.