Wednesday, March 30, 2011

Cider Batch 2 conclusion

A couple of nights ago Rosanna and I opened a bottle of my homemade cider. It was fantastic. Very dry, dense tiny bubbles, and packed a strong kick. It was great. I started initial fermentation on that cider on January 7th, so that means it has been a process of about 2.5 months for the cider to fully mature.

Here is the recipe in bold for posterity, and I'll interject with some explanations throughout.

1-7-2011
4.75 gal Apple Juice
3.75 lbs white sugar
1 packet Champagne yeast
Potential Alcohol 11%
Cloudy orange coloring.


The potential alcohol is measured using a tool called a hydrometer. A hydrometer measures the gravity of a liquid in relation to the gravity of water. In lay-mans terms, water is measured as zero on a hydrometer, sugar adds density to the mixture, which the yeast will eat and turn into alcohol. So in this case my initial reading told me that I had a gravity of 1.081 or 11% potential alc. If the yeast eats all of the sugar, I would end up with an actual 11% alc. content cider.

Within 24 hrs a thick Krausen appeared, after cleaning the airlock a vigorous bubbling started within 72 hrs.

Krausen is the foam that erupts out of a just started batch of cider or beer. Unfortuneately I didn't get a picture of this ciders krausen, but here is someone elses:

(Photo from the Phillyist)

1/30/2011
First Racking
Potential alc.= 1%
therefore actual alc.= 10%
Significant Calrifying,moderate bubbling, strong apple scent from airlock


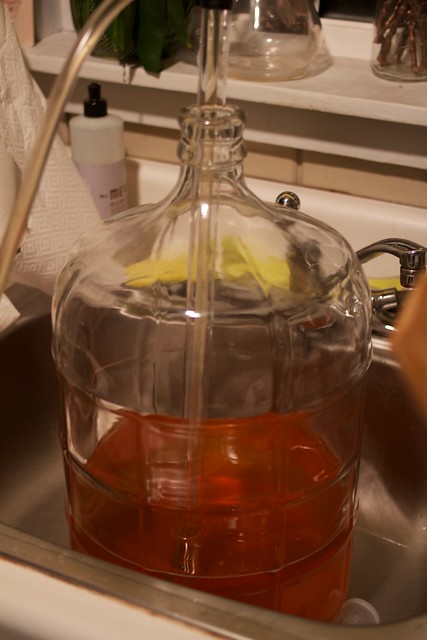
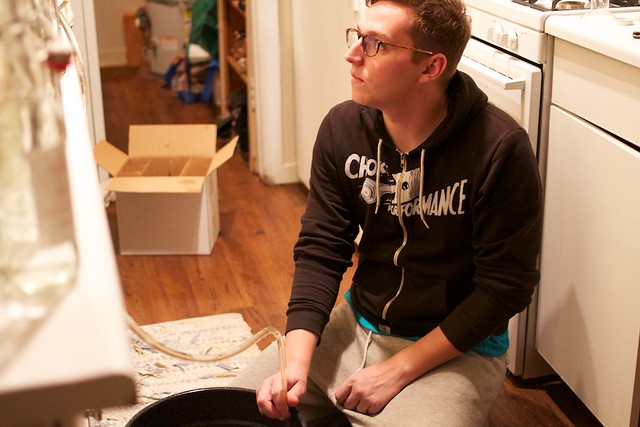
When brewing, the dead yeast and plant matter sinks to the bottom of the carboy. This gunk is called Lees. This is why I started with a cloudy mixture and over time it naturally clarifies. If a brew is left too long on the lees it can acquire what I've seen described on some websites as a "fecal taste". Gross. Racking is the process of moving the good stuff off of the lees into another clean container. Since all of the lees have now settled nicely on the bottom of the carboy it would be counterproductive to just pour out the cider so you have to remove it in such a way that doesn't disturb anything.

Racking when it comes down to it is just like siphoning gas. One hose goes from the first carboy into another, some sucking action, and everything transfers over nice and easy.


2/16/2011
Second Racking / Bottling
Potential Alc. = .5%
Actual alc. =~11%
added 1 cup corn sugar and 1 cup water for back carbonation
approx. 17 500ml bottles, 6 large mason jars, and a couple of random growlers.
Very clear amber coloring, sweet taste, weak fizz.


When corn sugar is added to a brew at the moment of bottling, the yeast fires up again and starts making CO2. Some people get impatient at this point and add too much sugar or a pinch too much of fresh yeast and the result is referred to as "bottle bombs".

3/27
C'est Magnifique!


Tomorrow I will have post about my next alcohol endeavor, here is a hint:

Monday, March 28, 2011

Hobbit Makeover

Sometimes I have simple ideas that grow and grow until they boil over into madness.
Friday night I was able to successfully install a malossi 70cc kit on my hobbit, Fright Night.
So, when I heard that Brendan was going to be at his home fixing some bikes I naturally thought that it would be a great opportunity to PAINT THE ENTIRE BIKE. Really guys, this is a horrible idea, don't follow my example. If you want to hurt your back, get horribly frustrated multiple times throughout the day, and cause marital discord, by all means, go ahead and disassemble a bike, spray paint it in the rain, and reassemble it all in the same day.

My photo editing software is being weird at the moment so I wasn't able to get the photos off my camera, I'll update this post with more photos later, but here is one picture stolen from Brendans blog.

Before


In the background of this picture of marital bliss, you can see my hobbit disassembled, laying in pieces.


Painting the frame.


Hang drying the painted pieces (in the rain).


Semi-After, I'm still assembling it in this picture.

Note the angry grimace and determined stare. The light sprinkling of rain throughout the whole paint process added a nice splatter paint effect. Try to replicate it, I dare you.
I eventually got everything back together and triumphantly spewed exhaust into Brendans garage.

Juuuust about complete...


COMPLETE!


The following day Travis and Rosanna and I went for coffee and wouldn't you know it, that nice fellow lent me a weakends pipe. I got it bolted up and everything performed beautifully.

Just look at the difference between the stock hobbit pipe and an aftermarket pipe.


Considering that I traded my hercules for this bike, and Phil gave me the malossi kit sans ring, and some polini clutch springs, Travis is lending me a weakends pipe, and I spent $2 on spray paint... This bike will be very fast and I have spent $9 of my cold hard cash on it.
I still need to do some tuning of the carb before I am confident that I won't seize the cylinder, but all in all it was a very productive weekend.

Wednesday, March 2, 2011

New stuff, and the same old thing

Sometimes when I sit down to write a blog post I think, "this is going to be stupid. The progress I've made is too incremental for anyone else to care about. Does this little bit of work really warrant a whole blog update?" But then I hear Travis' voice saying, "Blog posts should just be like your own journal, don't worry about an 'audience'. It's not for them." Wise words indeed.

So I got the hobbit or "Fright Night" as I like to call it, running with the tillotson carburetor. I had got everything buttoned up earlier this week, but a series of dumb mishaps foiled my plans. First I drilled and tapped the pulse plate and threaded in the pulse fitting. When I attempted to torque down the fitting my man hands, (ok, AND a wrench) sheared it right off in the plate. Wow, what an annoying feeling.
IMG_5879
IMG_5880

After a long drive to the nearest hobby store, I managed to get another pulse fitting and I put everything together on the subframe. It was at this point that I realized I hadn't put a gasket under the pulse spacer, and then when I fixed that and dropped the frame down on to the subframe I pinched the fuel line between the intake and the frame causing a major gash in my fuel line. After fixing the fuel line in a janky manner, I pushed the hobbit all around my neighborhood attempting to bump start it and actually got it to fire up and putt a little bit but ultimately decided that I needed to put some more time into the installation before pronouncing it a success.
Well, this weekend I took some time and decided to do it right. I procured some actual motion pro fuel line, which I have to say works a lot better than the vinyl crap I usually have laying around. The motion pro stuff has a lot thicker sidewalls so I feel like it is much less prone to kinking. Here is the pulse line all hooked up to the carb.
IMG_5901
IMG_5902

I also decided that my beer-box gasket left a little to be desired so I re-cut another one out of some thick gasket material. Here is the whole carb-intake sandwich right before going into the bike.
IMG_5899

I shot video documenting the whole process but when I sat down to edit it I thought, "wow, replacing a carb on a moped, quite possibly the most boring subject possible." So rather than a riveting narrative, I just put it to music and called it good.

18 with a bullet from Joel Kvernmo on Vimeo.


And what do you know, it runs! It started right up and goes like a banshee. Well, it goes like a slow banshee with a stock cylinder, stock pipe, and overly large carb. It's a bit gluggy. So now begins Fright Night Stage 2: The Search for a Malossi Ring and Pipe. I can get a ring for the malossi kit very easily but before I put that kit on I should probably have a pipe.

It's a very satisfying feeling to spend months on a project and finally be able to ride it around, but it's an even better feeling when that project can carry your butt up hills and to and from locations dependably for the same length of time it took you to build it. So what I'm saying is, it's all well and good to get this thing running, but the real success will be when I've ridden it for a while and can confidently say that I built it right.